Export to QuickBooks
Jonas Chorum is a Property Management Systems (PMS) vendor for such systems as Chorum, and does not directly support third-party applications such as the Windows Operating System or programs other than the PMS. All advice provided in topics related to non-PMS hardware or software is solely offered as a suggestion and if used is done so expressly and completely at your or your property’s discretion. If you or another individual at your property have questions concerning a specific function or issue with the physical PC or a non-PMS application like the internet or antivirus, it is strongly recommended you contact your hotel’s local IT service for consultation.
Jonas Chorum makes no guarantee, representation, or warranty regarding any changes you make to your computer operating system or network equipment, and any changes are completely your responsibility in the event of damage to the computer(s) or device(s) in question.
Be aware that QuickBooks Online and their publisher, Intuit, do not allow or officially support IIF file imports. This process only applies to the locally installed QuickBooks application (QuickBooks Desktop) and is done at your own discretion. Chorum will confirm this any time you manually attempt to generate an IIF file. Furthermore, the IIF file generated by Chorum requires QuickBooks Desktop 2007 or later to properly compatibility.
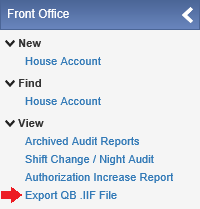
If your property uses a QuickBooks application that allows IIF file imports, and you need to export Chorum data for use, begin by accessing the Export QB .IIF File menu found in the Front Office module.
If you have never used this menu before, you must first map each department code you wish to track in QuickBooks on the upper half of the menu. Click the Add button to add a new row, then fill in each column. The first drop-down will use the Chorum department code, while the remaining columns (QB Account, Name, Class, etc) refer to the account data you have set in QuickBooks.

After mapping your account, always remember to click Save in the top-left corner to apply your changes before continuing to the next account (if more than one). Then, when you have finished mapping all desired accounts, use the lower-half of the menu to select the date range you wish to export, then click Load Data to preview the data you plan to export.
As the process loads each individual transaction associated with the mapped account and may result in large volumes of data, we strongly recommend limiting the date range to a 7-day period.
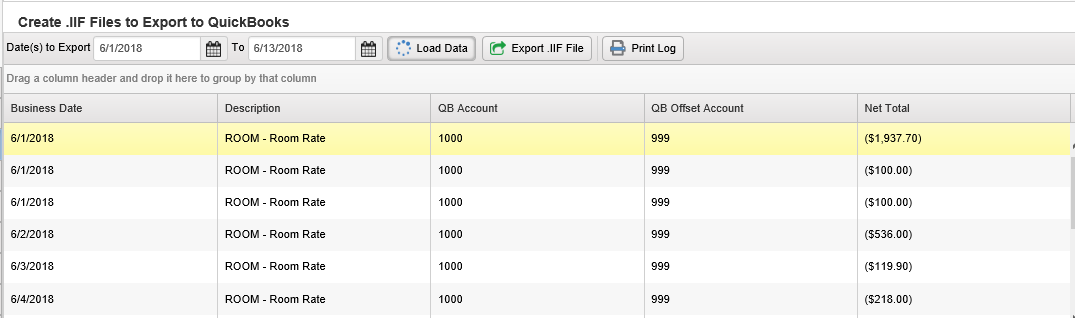
If all data looks correct, click the Export .IIF File button to generate the file, at which point you can import it into the QuickBooks application. When generating the file, choose an appropriate location on your local hard drive, then name the file as you see fit.
While the exact process may vary depending on the version of the QuickBooks application you are using, in most cases after opening QuickBooks, simple click File in the top-left corner, followed by Utilities, then Import, then IIF Files. From here, a new window will open allowing you to locate and select your file for import.
Afterward, we recommend checking the QuickBooks application successfully imported the contents of the file. In most compatible versions of QuickBooks, the application provides a Chart of Accounts menu to review the balances of listed accounts - access the menu and inspect each imported account's QuickReport (the menu opened when selecting an account) and verify each posting and the appropriate totals are accounted for in the report.
An "IIF" file, short for "Intuit Interchange Format," is a file type meant for use with QuickBooks Desktop specifically, allowing the conversion of financial data from one system into a "General Journal" entry (detailed below). The contents of the IIF file are converted into a machine-readable ASCII, Tab-Separated Value format. Creating these manually can be time consuming at best, but fortunately Chorum's back-end "QB Back Office" utility handles the bulk of the legwork for you.
While we recommend getting a more defined answer from the Intuit team or website directly, a general journal entry is in essence a ledger, balancing debits![]() A debit addresses any amount charged to the customer (room charges, housekeeping services, etc). against credits
A debit addresses any amount charged to the customer (room charges, housekeeping services, etc). against credits![]() A credit addresses any amount paid by a customer or reducing the overall debits billed to the customer (cash or credit card payment, coupons, etcetera) using one or more accounts (much like Chorum's Guest, City, and Deposit Ledgers).
A credit addresses any amount paid by a customer or reducing the overall debits billed to the customer (cash or credit card payment, coupons, etcetera) using one or more accounts (much like Chorum's Guest, City, and Deposit Ledgers).
Likewise, "GJEs" are used to track your total revenue in the noted area(s), typically reflecting a positive balance when funds are owed to your property under the reported accounts, and reflecting a negative balance (marked by parentheses) when your property has collected more than has been charged to guests and customers.
If your property intends to regularly use QuickBooks Desktop alongside Chorum, be aware that after finishing initial set up, you can automate the export process to run as part of your daily audit (you will still need to manually download the import the data into QuickBooks).
1. Access your hotel's audit configuration settings. These can be found in the Administration module, under the Property Settings folder, in the Night Audit Settings menu. 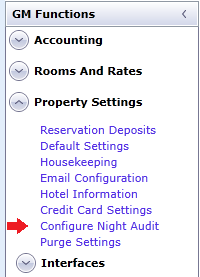
2. On the Night Audit Reports tab, locate *Quickbooks Export (.IIF) and checkmark the Include in Audit Reports column to the left.

Save your changes in the top-left corner. The IIF file will now automatically generate for the finished business date during the nightly audit.
3. To retrieve exported files, access the Front Office module and access the Archived Audit Reports menu. 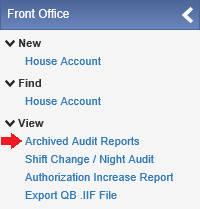
4. Set the Start and End Date to the desired business date(s) you wish to retrieve the generated files from, then click Search. Keep in mind that dates prior to enabling this feature will not generate the file automatically, and thus won't have an entry in your archived reports.
5. Click the hyperlinked business date to the left to download the IIF file. From here, the process is identical to the steps to save and import the file into QuickBooks are identical to those detailed above.